
.png)
.png)
.png)
.png)


 1 hour ago
5
1 hour ago
5
ARTICLE AD BOX
For many people with diabetes or those monitoring their blood sugar levels at home, the thought of a needle can be concerning. With modern devices designed to make the process quick, nearly painless, and incredibly efficient, home blood sugar testing has come a long way.
In this article, we provide a step-by-step guide on how to test your blood sugar at home while addressing one of the biggest concerns: pain perception. Good news - it's not as bad as you think.Since blood sugar levels may fluctuate throughout the day due to factors such as food intake, stress, and physical activity, constant monitoring and taking informed decisions with the help of your treating physicians helps to keep a check on them and prevent any adverse effects. Regular and structured blood sugar monitoring with the help of your treating physician can help you:To monitor highs and lows to avoid emergencies
- To adjust medical treatment for better control
- To understand patterns that help you make healthier lifestyle choices
- To prevent long-term complications like nerve damage or heart issues
Here's a step-by-step guide on how to check your blood sugar at home-1. Prepare Your Materials
- Ensure you have all items ready and within reach.
- Wash your hands with warm water and soap, then dry thoroughly. Why? Clean hands help avoid infection and ensure accurate readings. If you cannot wash your hands, use an alcohol swab to clean your fingertip and let it dry completely.
2. Prepare the lancing device
- Insert a new lancet into the lancet device according to the instructions provided with your device.
- Adjust the depth setting if your lancet device has this feature — beginner users may want a moderate setting.
3. Insert the test strip
- Take a test strip from the container and insert it into the glucose meter as directed.
- The meter will typically turn on automatically once the strip is inserted.
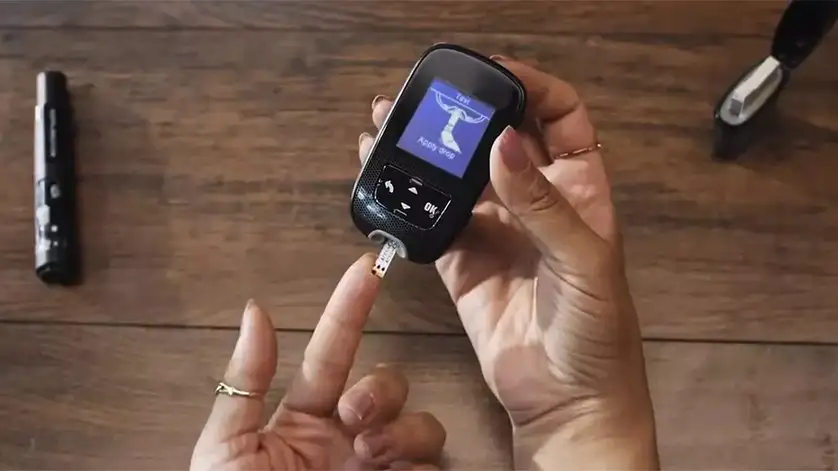
4. Obtain a blood sample
- Choose a finger for testing (usually the side of the fingertip is less painful).
- Use the lancet device to prick the side of your fingertip.
- Gently squeeze or massage your finger if needed to get a drop of blood.
5. Apply blood to the test strip
- Touch the blood drop to the test strip’s designated area.
- Wait for the meter to analyse the blood sample.
- The meter will display your blood glucose level within a few seconds.
6. Record your results
- Note down your blood sugar reading in a logbook or digital app.
- Record the date, time, and any notes about food, medication, or activity.
7. Dispose off used materials safely
- Remove the used lancet from the lancet device carefully and dispose of it in a sharps container.
- Dispose of the used test strip according to your local guidelines.
- Clean the lancet device if needed.
8. Clean up
- Wash your hands again.
- Store your glucose meter and supplies in a clean, dry place.
Additional tips
- Always check the expiration date on test strips.
- Avoid touching the test strip’s blood application area.
- Perform tests regularly as advised by your healthcare provider.
These are the basic steps for using a glucometer at home. Testing your blood sugar at home can be simple and nearly painless.
It's a small routine that makes a big difference in your overall health. With the right technique and a bit of practice, you'll gain confidence, feel more at ease, and stay on top of your numbers—one easy step at a time.Disclaimer: The views and opinions expressed in the story are independent professional judgments of the doctors/experts, and TIL does not take any responsibility for the accuracy of their views. This should not be considered a substitute for medical advice. Please consult your treating physician for more details. This article has been produced on behalf of Roche by Times Internet’s Spotlight team.


 English (US) ·